


First Year Anniversary
Yesterday marks one year since I embarked on my boat building project. While I am not as far along as I had originally hoped to be, it has been a very satisfying journey and realistically, given the constraints I have had to work under, the progress I have made is what I should have expected.
This time last year I had already received the study plans and made the decision to build the boat. The building plans were ordered and on their way. Over the course of the following month, I organized my garage for building, including upgrading the lighting. I developed a lumber purchasing plan and made initial purchases.
From there I had to purchase a few power tools and then began the production of boat frame parts. Initially, I was tentative about cutting the expensive lumber and went slowly trying to develop my technique. Looking back on that time, I could have done things differently, but we all learn from experience and that is precisely what I have done.
There was a delay of four months, an interminable period or me, when financial reasons required me to stop. While I never lost my enthusiasm for the build, I feared that things would go south and the build would be undone. But I persevered and was able to re-start back up in January of this year.
Along the way I met some new people, two who are building the same boat as myself, another who intends to after he gets through his own issues, as well as many more on the Glen L Boat Builders Forum, most of whom are building their own boats of various designs.
This year, so far, has seen the completion of construction of six of the seven frames. Within a month I will be beginning the construction of the building form and at that point I can get the frames mounted and start assembling the boat hull.
For me, these will be exciting times. Although there have been days when I could look at the completed parts and see the boat taking shape in my mind, mounting the frames on the building form will lend a visual representation of the boat that will be undeniable. Another builder put it differently; "Holy !&%#$^ , Im building a boat!". Thanks for that quote Andrew. :)
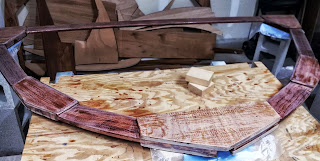
This weeks update is rather small. Ive had many other things to do and have only been able to put in a very few hours on construction. Frame 5 has had several coats of epoxy added. I still have two more coats to go on this frame and then it will be complete.


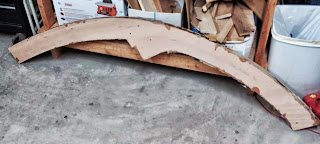
I also began gluing up the stem. Readers will recall that this is made of three pieces of 3/4 inch plywood. Two of those pieces have been laminated together as well as having bronze wood screws installed. I have yet to clean up the glue from this first lamination.
Gluing up was simple but somewhat rushed. I found a spot on the layout board and nailed down several small pieces of 2 by 4 lumber to hold the stem pieces in position. Wax paper was suitably placed to keep the stem from being glued to the blocks of wood as well as to the layout board.
Then came the rushed portion of the job. These are rather large pieces which had to be completely covered with unthickened and thickened epoxy. The unthickened resin is applied first to presoak the plywood. It is followed within minutes by the thickened resin. Since the resin will "kick off" fairly quickly in the mixing cup, I had to work fast.
I did what I could to reduce the amount of time needed to mix and apply the resin. I knew that if I simply mixed up one big batch, that most of it would harden before I could use it. I knew from past experience how much resin I could work with and approximately how long I had before it hardened.
So I filled several mixing cups with measured amounts of part "A" of the resin. All the stir sticks were ready to go. I had a foam brush (and an extra just in case) ready to smooth out the unthickened epoxy first. The silica gel for thickening was ready to drop into the mixing cups. And I made sure that I would not get any distractions once I started.
The first piece of plywood was set in place between the blocks of wood. The second piece as on the workbench, ready to go. Both pieces were cleaned prior to beginning the glue up. The second piece had also had the screw locations determined and marked on the unglued side. The screw gun was ready to go and the bronze screws were in a small pile ready for use.
The process was, add part "B" of the resin and mix up cups of unthickened epoxy (one cup at a time) and apply that cup using the foam brush. Then mix up thickened epoxy (again one cup at a time), and spread it out over the same area using a plastic spreader.
Then the second piece was placed in position on top of the first piece. I pre drilled two holes and installed the wood screws, ensuring that the parts stayed lined up. Then the remaining holes were pre drilled and the remaining wood screws were installed. Then I had to clean up as much squeeze out as I could and set cinder blocks on the assembly.
The whole process once started lasted about 25 minutes, but I felt like I was running a marathon, and it was very warm that day, so I was drenched by the time I had finished.

So thats the extent of the work for this week. This coming week I will complete frame 5s encapsulation, complete the glue up of the stem, and begin work on constructing the knee. I will explain about the knee next time, but it is a small piece that reinforces the transom.
Until next week........
This time last year I had already received the study plans and made the decision to build the boat. The building plans were ordered and on their way. Over the course of the following month, I organized my garage for building, including upgrading the lighting. I developed a lumber purchasing plan and made initial purchases.
From there I had to purchase a few power tools and then began the production of boat frame parts. Initially, I was tentative about cutting the expensive lumber and went slowly trying to develop my technique. Looking back on that time, I could have done things differently, but we all learn from experience and that is precisely what I have done.
There was a delay of four months, an interminable period or me, when financial reasons required me to stop. While I never lost my enthusiasm for the build, I feared that things would go south and the build would be undone. But I persevered and was able to re-start back up in January of this year.
Along the way I met some new people, two who are building the same boat as myself, another who intends to after he gets through his own issues, as well as many more on the Glen L Boat Builders Forum, most of whom are building their own boats of various designs.
This year, so far, has seen the completion of construction of six of the seven frames. Within a month I will be beginning the construction of the building form and at that point I can get the frames mounted and start assembling the boat hull.
For me, these will be exciting times. Although there have been days when I could look at the completed parts and see the boat taking shape in my mind, mounting the frames on the building form will lend a visual representation of the boat that will be undeniable. Another builder put it differently; "Holy !&%#$^ , Im building a boat!". Thanks for that quote Andrew. :)
This weeks update is rather small. Ive had many other things to do and have only been able to put in a very few hours on construction. Frame 5 has had several coats of epoxy added. I still have two more coats to go on this frame and then it will be complete.
I also began gluing up the stem. Readers will recall that this is made of three pieces of 3/4 inch plywood. Two of those pieces have been laminated together as well as having bronze wood screws installed. I have yet to clean up the glue from this first lamination.
Gluing up was simple but somewhat rushed. I found a spot on the layout board and nailed down several small pieces of 2 by 4 lumber to hold the stem pieces in position. Wax paper was suitably placed to keep the stem from being glued to the blocks of wood as well as to the layout board.
Then came the rushed portion of the job. These are rather large pieces which had to be completely covered with unthickened and thickened epoxy. The unthickened resin is applied first to presoak the plywood. It is followed within minutes by the thickened resin. Since the resin will "kick off" fairly quickly in the mixing cup, I had to work fast.
I did what I could to reduce the amount of time needed to mix and apply the resin. I knew that if I simply mixed up one big batch, that most of it would harden before I could use it. I knew from past experience how much resin I could work with and approximately how long I had before it hardened.
So I filled several mixing cups with measured amounts of part "A" of the resin. All the stir sticks were ready to go. I had a foam brush (and an extra just in case) ready to smooth out the unthickened epoxy first. The silica gel for thickening was ready to drop into the mixing cups. And I made sure that I would not get any distractions once I started.
The first piece of plywood was set in place between the blocks of wood. The second piece as on the workbench, ready to go. Both pieces were cleaned prior to beginning the glue up. The second piece had also had the screw locations determined and marked on the unglued side. The screw gun was ready to go and the bronze screws were in a small pile ready for use.
The process was, add part "B" of the resin and mix up cups of unthickened epoxy (one cup at a time) and apply that cup using the foam brush. Then mix up thickened epoxy (again one cup at a time), and spread it out over the same area using a plastic spreader.
Then the second piece was placed in position on top of the first piece. I pre drilled two holes and installed the wood screws, ensuring that the parts stayed lined up. Then the remaining holes were pre drilled and the remaining wood screws were installed. Then I had to clean up as much squeeze out as I could and set cinder blocks on the assembly.
The whole process once started lasted about 25 minutes, but I felt like I was running a marathon, and it was very warm that day, so I was drenched by the time I had finished.
So thats the extent of the work for this week. This coming week I will complete frame 5s encapsulation, complete the glue up of the stem, and begin work on constructing the knee. I will explain about the knee next time, but it is a small piece that reinforces the transom.
Until next week........
Langganan:
Posting Komentar (Atom)

0 komentar:
Posting Komentar